Thursday, June 30, 2011

Pretty Things Thursday: Embroidery Scissors

I have a problem when it comes to needing pretty accessories for my hobbies. One of my biggest weaknesses is a pretty pair of embroidery scissors. Hence why I have three pairs.


Early on in my crafting, I came across a pair of stork embroidery scissors.  I was in need of a small pair of scissors, so I snatched them up.  I used them for embroidery and while sewing as thread snips.

 
Keeping track of them got tiresome after a while, so when the Wicked Step Scissors were released, I picked up a pair of them to keep in my embroidery box.

I was content with my scissors for separate hobbies, and then Sublime Stitching threw a wrench into the situation: they released the Owl Scissors.  How dare they!  I immediately felt compelled to order a pair, but controlled myself because I really had no reason to have them.  Then, as I mentioned yesterday, a situation presented itself to me and I felt that I could finally reward myself with a pair.  I get that they look like an owl, but they remind me of the Golden Snitch even more.  They are super sharp and I love them.  (Side note: only two more weeks, Potter fans!  I can’t wait!)

From now on, I’m going to have to ignore embroidery scissors at all costs.  Even I can’t think of an excuse to buy another pair!

Do you have a weakness when it comes to your crafting supplies?

Wednesday, June 29, 2011

New Embroidery Supplies!

Can you believe I am already up to post 100?  I can't!  It's a good thing I'm well on my way to completing the challenges I set for myself at the beginning of this year!

Since starting Mr. Fox, I’ve been enjoying embroidering during my lunch break.  I ran into a problem though, because I would often feel like embroidering at home or on the weekends and all of my embroidery supplies would locked away in my desk at work 30 miles down the road.  A couple of times I brought my bag of embroidery supplies home with me at night, just in case, but this got old really quickly as I already carry a huge bag on the train with me.

Last week, I finally broke down and ordered duplicates of my embroidery supplies.  Was this completely necessary?  Probably not, but I like being able to do what strikes my fancy when my fancy is stroked.  It’s just not as fun to sew or knit when what I really want to be doing in that moment is embroidering.  I love sewing, knitting, and embroidering, but sometimes I want to do one more than the others.  The good news is that I always feel like doing one of my hobbies.  I can’t remember the last time I was bored! 

After I made the decision to buy duplicates, I clicked on over to Sublime Stitching and started adding goodies to my cart.  I’m warning you: this site is dangerous.  After some editing, this is what I ended up with:


I won’t tell you what the total ended up being.  I bought the transfer paper and tracing paper so I would have enough supplies to embroider on our Great Western Adventure.  God forbid that I need to trace something  and be out of tracing paper!

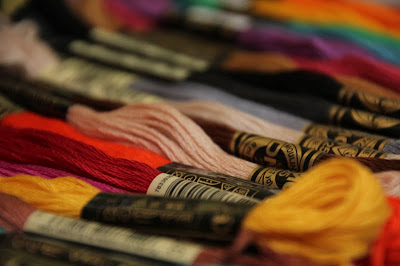
I started using Thread Heaven (the little blue box on the left side of the picture) a few months ago and love what it does to the thread.  Dubbed “thread conditioner,” it makes the floss a little easier to work with and protects the floss on your finished artwork.  Of course I had to have a jar at each of my embroidery locations!


If you remember seeing my embroidery floss stash that I shared in the past, you’d probably say that I didn’t need to buy the floss combo.  You would be almost right.  The main issue that I have with my thread stash is that I have a lot of the same colors.  This is because when I first started embroidering, I bought one of those giant packs of floss at Joann.  I can’t say this was a mistake since I use those colors a lot, but it is nice to have a bunch of different shades of floss.  I found myself going to Joann whenever I had a project and picking out more shades.  Since I won’t be able to do this on our road trip, I thought a different color combo would help keep me satisfied with my color choices.

I ended up getting two packs of needles because I’ve been using the same needles since I started embroidering and I decided it was time to start fresh.  I have a black version of the tool case (the one in the picture is pink) and it works out perfectly to hold my scissors, needles, and anything else small that I’m working with (most often a couple of colors of thread).  The folks at Sublime Stitching shipped the Owl Scissors (which you’ll get a closer look at tomorrow) and the needles already in the tool case for me.  How adorable are they? 

My hope is that having two sets will help with faster progress on a few embroidery projects that I have in the works.  I’ll share them with you soon!

Monday, June 27, 2011

Sewaholic Crescent Skirt Muslin #3

Friends, it looks like the Crescent is not meant for a body of my proportions.  Which is sad, because I've seen a bunch of adorable Crescents on other people and I really love the design.  The gathers just aren't doing kind things to my hips and backside.

Much like view B, view A looks good from the front.


When I move sideways, the trouble starts.


Then when I turn around, it's all over.


Even though I ended up making three, I'm glad that I made muslins first so I didn't waste the more expensive fabric that I bought for the skirt.  I consider this a good lesson learned: I should never buy skirts or dresses that have gathers right at the hip.

I'm bummed because I really love how the waistband comes together.  And I love the pockets.  I wonder if I can somehow tweak the pattern so there aren't any gathers and it's more of a straight skirt.  Any suggestions?

Now I need to figure out what to make with the fabric that I bought for the Crescent.  Perhaps another Ginger is in store!

Saturday, June 25, 2011

Sewaholic Crescent Skirt Muslin #2

When I made a muslin of this skirt the first time around, I realized right before I was about to put in the zipper I had cut the wrong size.  This time around, I made sure to cut out the correct size.  I was 1/2" above the waist measurement for the size 6, so I decided to go with it anyway and then just borrow from the seam allowance.  To my delight, this worked out well.  The waist of the skirt fits perfectly.  Since this was my second time putting together the skirt, it went pretty smoothly.  The only issue is that, now that I'm able to zip the skirt up, I realize that this style skirt isn't the most flattering on me.  I'll share these pictures since we're friends and this is a learning process.

Let me first say that, from the front, this skirt photographs a whole lot better than it looks in person. 


I looked at the pictures of the front and second guessed what I saw in the mirror.  I went back to re-examine myself in the skirt, but the second look resulted in the same decision as the first: the gatherings around the hips were making my butt look gigantic.  Once I got to the side and back view pictures, I knew I made the correct judgment.  This skirt adds way too much volume to my already ample backside.


Say it with me: yikes.  The side view is the worst angle to see me in this skirt.  Here's a look from the back.


The waist looks nice though, so I'm going to try view A, which has a straighter skirt than view B.  I'm also going to add some length to the skirt so it hits me right at the knee, which is much more flattering than a couple inches above the knee.

The good news is that I don't have to cut out an entirely new muslin.  I just have to cut out the skirt pieces since the waistband and pockets are the same for all three views.  Stay tuned for muslin #3!

Thursday, June 23, 2011

Pretty Things Thursday: Turkish Tea Light Lantern

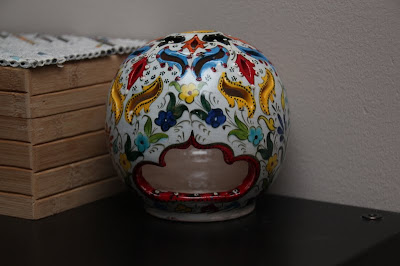
This awesome tea light lantern was brought home from Turkey by my sister and her husband.  They took a cruise around the Mediterranean for their honeymoon, and I was very excited that we received something ceramic when they returned. 


There are holes around the sides and a larger hole in the top for light and heat to escape.  I love the detailing, especially the little black dots in the yellow ring around the hole.  We just use it as a nice decoration since we don't light too many candles around here.  I'm convinced that Flick will somehow light himself on fire.


Even the back, which we don't see that often since it's usually facing the wall, is pretty.  Now that I see it again, I might consider flipping it around for some of the time so we can enjoy the back.


Aren't handmade local goods the best gifts to receive?

Wednesday, June 22, 2011

Chambray Colette Ginger Skirt

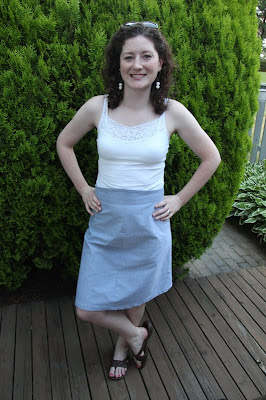
Here she is, my Ginger skirt!


She took way longer than I expected to complete, mostly because I didn’t have as much time to work on her as I wanted.  The Ginger was pretty easy to put together, but again I struggled because I chose a fabric that looked the same on the right and wrong sides.  I somehow managed to mix up what side was what for the waistband, which delayed construction a bit.  I’m still not entirely sure that I got it right, but the skirt looks nice so I’m not going to worry about it anymore.


When I made up the muslin, the hips seemed a wee bit too tight, so I used a French curve to slightly grade out the hip area by borrowing from the inch seam allowance that I was using.  When I tried on the skirt after it was all put together except for the hem, I thought the fit was pretty good.  It seemed a tad too big, but I figured only I could tell because I saw it when it was a tad too tight.  So I proceeded to hem the skirt.  When I tried on the finished product, it was obviously too big.  Instead of taking out the entire hem, I took out the hem around the side seams and then pinched in the excess from the side seams.  I probably ended up taking out as much as I added in.  Good times.  I think the finished product looks pretty awesome!


And check out the inside, which looks just as pretty as the outside thanks to Mr. Nilsson. 


Mr. Nilsson threw a wrench in things early on in the construction process when I accidentally broke one of his needles, didn’t realize it, and then continued to serge the front panel seam.  When I went to press the seam open, I was puzzled as to why there were perfectly incremented pulls all of the way down the seam.  Apparently that’s what a broken needle will do to chambray!  Thankfully I had enough extra fabric to cut the two front panels again.  I am so glad that I cashed in all of my credit card points to buy Mr. Nilsson.


The shirt that I had planned on wearing with the Ginger didn’t work out because its button-down front was a little bulky under the high waistband.  I was forced to wear this white tank to work, but since it has spaghetti straps I had to wear a black cardigan over it.  I must say that the Ginger is super comfortable.  I survived a day at work without it feeling tight or restricting, including a long walk to eat lunch at Bobby's Burger Palace (I highly recommend the Crunchburger and a black and white milkshake if you find yourself in University City).  I was surprised at how good the skirt looked after a full day of wear and train riding.  I purposely didn't iron her before we took pictures when I got home from work and there was only mild wrinkling from sitting down.  Bonus!

I definitely need to invest in a different top to go with this skirt.  I’m just going to have to whip up a Pendrell!  I’m thinking a sleeveless version this time (not to mention the correct size too).  What color do you think I should use?

I’m thrilled that I've been finishing all of the projects that I’ve been working on.  Next up is my Crescent skirt!

Monday, June 20, 2011

Camera Strap Cover

I am happy to report that I had a super productive sewing/embroidery weekend!  I finished Mr. Fox on the train ride home on Friday, finished my Ginger skirt and cut out all of the fabric and lining pieces for my Passport dress on Saturday, and had some time left on Sunday to make a camera strap cover so Nick and I can tell our cameras apart.  Success!  You’ll have to wait to see Mr. Fox and Mr. Bird (who has remained under wraps) until we give them to our friends, and you’ll have to wait until Wednesday to see my Ginger skirt since I won’t be able to take pictures of it until tomorrow afternoon because we have a Frisbee game tonight after work.  You’ll just have to keep checking back!

A camera strap with a pocket for the lens cap has been on my to-do list since we got our cameras last month.  I really needed a good place to put my lens cap while taking pictures.  When I was wearing a skirt or shorts with pockets this wasn’t a problem, but other times I was wearing a pocket-less outfit, forcing me to tuck the lens cap into my bra strap.  This brought me back to middle school field hockey days when we used to tuck our mouthguards into our bra straps when we weren’t playing.  Looking back, this is a lot less gross than our other method: tucking the mouthguards into our socks.  I’m sad to tell you that I usually used the sock method.  Gross, yes, but I never lost my mouthguard.  On the other hand, I was always losing my lens cap when I used the bra strap method, so I needed to get moving on this camera strap project.

Last night after Father’s Day activities, which ended in a rousing game of duck duck goose with 7 adults and only 3 children, I had just enough time and energy to whip up the camera strap.  I used Simply Modern Mom’s tutorial, which was really well explained and included lots of pictures.  My camera strap’s dimensions were the same as hers, so I didn’t have to do any extra math to draw out the template (whew!).

Then it came time to decide what fabric to use for the strap and pocket.  ::Nerd alert::  Remember back in February when I stumbled across that Girl Scout fabric?  I have been saving it for the perfect project and I thought now was the time to finally cut into the green and brown badge prints.  Since I was never “officially” a Girl Scout, I decided that the green badges would be used for the inside/pocket and the brown Brownie badges would be used for the outside.

A short while later, I had my camera strap cover!  It really was simple to put together.  The cover is basically a slip cover for your camera strap, which means that the cushioning and durability of the original strap is still intact.  The bonus is that you can take the cover off and wash it.  I’m sure my strap cover is going to need a good washing by the end of our three-week Great Western Adventure.


Here is a close up of the pocket.  The lens cap fits in so snuggly that I won’t have to worry about losing it.  In case I ever find myself upside down while taking pictures, I checked to see what would happen if I turned the pocket upside down with the lens cap inside.  It didn’t budge!  Hurrah!


The green badge fabric even has the photography badge on it.  How perfect is that?


From start to finish, this project would have taken me a little over an hour if I hadn’t had to keep getting up to change the laundry.  It’s so easy that I’m thinking about making another cover just in case this one gets extra gross during our trip. 

If you happen to be in Yellowstone or the Grand Canyon in August, you’ll be able to pick me out of the crowd.  I’ll be the one with the nerdiest camera strap.

Speaking of my camera, Grosgrain featured a review of our awesome Tamron 18-270mm lens today.  Check it out!

Saturday, June 18, 2011

Vote for Us!

When Nick and I bought our house 2 1/2 years ago, we knew that we would basically have to redo every single space in the house.  Our downstairs is the biggest project, so we thought we'd take our chances and apply to be on HGTV'd, the new show on HGTV that redoes a room in your house.  Since our downstairs is multi-functional as a living room and dining room and connects to the kitchen, we're hoping that if we get picked they'll do the whole thing for us! 


But we need your help!  I'm really hoping that you go on over to our space profile and vote for us!  But please don't judge us on how ugly our house is.  We are confident that with some paint and furniture that fits our taste (ours is all hand-me-down), our house is going to be awesome!

Thank you for helping us out!

Thursday, June 16, 2011

Pretty Things Thursday: Dipping Dishes

Last summer, my sister and her husband took a trip to Spain.  Look what they brought back for me and Nick!


They are a set of dipping dishes that were accompanied by different flavors of olive oil.  Yum!


I love the details that are handpainted on and the colors are so cheerful.  Even the bottoms are fun.  They have a speckled look to them.


Don't let the photos fool you: these guys are only about three inches in diameter.  When they're not in use, they brighten up the bookshelf where we keep our cookbooks.


It's funny that most of our pretty ceramics are from countries other than our own.  There's more in store next week!

Tuesday, June 14, 2011

Nick's Birthday Present

Here we are, already a month after Nick's birthday and I'm just getting around to finishing up his present.  Don't worry, I'm not a terrible wife.  I gave him his gift on his actual birthday, but haven't gotten a chance to frame it until now.  Here it is:


We had agreed to be frugal for this year's birthday gifts since we both just bought super fancy DSLR cameras.  I normally make him something handmade to accompany his birthday and Christmas gifts, so this year I decided to only go homemade.

One day I stumbled across these neato Scrabble pillows on Etsy, and I decided that I was somehow going to incorporate Scrabble tiles.   


Nick is a big Scrabble fan and is pretty darn good at it.  In a two person game, his highest score ever was in the upper 500s.  I'm happy if I break 100.  I knew he would never forgive me if I dipped into the tiles from our Scrabble game, so I took to the internet to find out where I could get some tiles without having to buy a whole game.  Turns out you can get them at Michaels, but I went over to Ebay instead for a discounted price.  Before I ordered I counted the quantities of letters I would need, and I realized that I needed to get two sets of letters, since I had one too many H's.  I hot glued the tiles onto a piece of linen that I had in my scrap bag.

The quote is from one of our favorite songs by Edward Sharpe and the Magnetic Zeroes.  It's so happy!  One of our friends said it made her want to frolic through a field of daisies, which is spot on.  


I embroidered our home state of Pennsylvania around it and marked where we live with a star.  It's a pretty simple gift but I love it.  I'm happy to say that Nick loves it too!  We hung it up in our foyer next to an awesome key doorknocker that Nick's sister gave us for Christmas the year we moved into our house.


Nick's gift is the first item on what will become the embroidery wall.  Picture something like this frame wall, but embroideries instead.

Image Source

Our embroidery wall is going to go up our stairwell, to the right of Nick's gift.


The second item for our embroidery wall will be the Silly Birds.  I just have to get my act together and finish framing them.  Otherwise, I envision a mix of embroideries on the wall, including a Mr. Fox of our own.  I also have my eye on a few patterns from ThisTinyExistence, including this awesome armchair.  My parents have an armchair that is pretty much identical to that chair, except that it's blue.  He is waiting in their house for us to have a big enough house to adopt him.  One day!

Image Source

Do you have any favorite embroidery patterns?

Monday, June 13, 2011

Lisette Passport Dress Muslin

I'm happy to share with you that I actually accomplished what I intended to this weekend.  Here is my Passport muslin!


(Please excuse my hair.  These pictures were taken after a full day of cleaning.) This dress went together very quickly.  Granted, I was skipping some steps (like the facings, which I'm going to switch out on the finished dress for a full lining, and I couldn't figure out how to put the zipper in, so I just pinned it until I can talk with my instructor about it), but it only took me a little over an hour to put this beauty together.  I really like how it fits, although the muslin is a bit big in the chest (I was expecting this).  I really like the tuck detailing on the front of the bodice and darts on the back.
 

The pleats at the waist add are a nice touch as well.  Sadly, this dress doesn't photograph as nicely as it looks in person.  I'm guessing this is because the color of muslin looks so blah on me. Trust me, it's very flattering!


I'll be working through the minor fitting issues in this weeks sewing class, and hopefully sewing up the real deal next weekend!

Friday, June 10, 2011

Progress and Plans

Isn't Mr. Fox looking quite handsome today?


I was nervous about getting in all of the tiny details, so this time around I decided to tackle the harder parts first (last time I started with the tie).  I don't know what I was so worried about.  As long as I have another copy of the pattern and the color guide in front of me, getting all of the tiny details isn't a problem.

I'm going to try and resist posting further progress of him until he's finished.  I'm doing this for two reasons: 1) He should probably be a surprise to the friends he is going to, and 2) Once he is finished, I envision posting a timeline that shows the progress that I made after each lunchtime work session.  I only got to work on him two days this week since yesterday our building was without air conditioning, and, with the temperature nearing 100 degrees, we were barred from the building.  Sad, I know.

Wednesday marked the start of a brand new season of Project Ridgway.  I am working on a Lisette Passport dress.  During Wednesday's class I was able to cut out and thread trace my muslin pieces.  The finished dress will be using this light and lovely poplin.
Image Source

What are you up to this weekend?  I am keeping my sewing to-do list short and reasonable: finish up my Ginger skirt and sew the muslin for the Passport dress.  If I am super productive, I want to get back to working on my Crescent skirt

Thursday, June 9, 2011

Pretty Things Thursday: Ork Philadelphia Neighborhood Screen Print

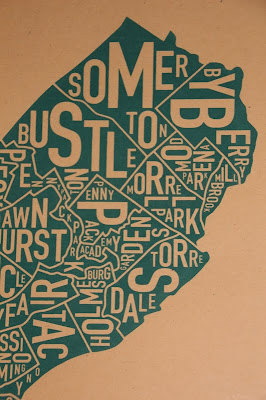
A few years ago I stumbled across the Brooklyn Ork neighborhood poster and I loved it.  At that point, there were only a few maps, but Philadelphia was on the list to be created.  As soon as it became available, I snatched one up.


Not only do I love that all of the neighborhoods are spelled out, but I love the way that Ork fits the names within the neighborhood boundaries but making some letters bigger and flipping around some letters.  In case you aren't familiar with Philly neighborhoods, some that are listed below are Somerton, Byberry, Bustleton, Torresdale, and  Holmesburg.


Look there, it's University City where I work!  And then to the right and below, Schuylkill, which is named after the neighboring river and is quite hard to learn how to spell. 


But my very favorite neighborhood is Swampoodle, which I had never heard of before I got this poster.  I'm pretty sure this name isn't currently used, but I'm on board for Ork including it because it's so hilarious.


I keep this poster above my desk in our office and it's a fun distraction to read all of the neighborhood names.  Won't you be my neighbor?

Wednesday, June 8, 2011

Oh Happy Day! Paris Trip Giveaway

This morning I found out about a crazy awesome giveaway from Oh Happy Day: a trip for two to Paris!  
Image Source

Having never been to Europe, I would LOVE to win this amazing trip, which includes a guided tour by Oh Happy Day's Jordan, airfare from the continental US, and lodging at the super fancy Mama Shelter.  Check out Oh Happy Day to learn more about how you can enter to win!

Tuesday, June 7, 2011

Belated Housewarming Gift

The stars aligned for me back in February when friends of ours moved into a new apartment and Sublime Stitching released an amazing pack of Ryan Berkley transfers.

Image Source

The illustrations reminded me of Fantastic Mr. Fox and I instantly fell in love.  Even more perfect, I know my friend loved the animation in Mr. Fox, so embroidering these lovelies onto some tea towels seemed like the perfect housewarming gift.  I quickly ordered the PDF transfers and then waited for my Most Awesome Tea Towels to arrive in the mail so I could get working.

They arrived a few days later and, since I printed the transfers on a laser printer, attempted to iron the transfers onto the tea towels.  I've never done this before and was a little skeptical that it would work.  I'm thinking I didn't apply as much pressure or keep the iron on for long enough, because the images were just barely visible on the towels.  The detailing is so fine on the patterns that I was worried about trying to re-transfer the transfers, so I attempted to continue with very faint lines.

You know where this is going.  I got through Mr. Fox's necktie and jacket collar before I decided to cut my losses and start fresh.  That was 4 months ago, which officially puts me in the bad friend category.

I ordered new tea towels and this time around,  I decided use carbon paper and trace the transfers with a stylus.  This is how I spent today's lunch.


I'm partial to the iron-on method of transfers, but I'm no stranger to using carbon paper.  Jenny Hart makes things so easy for us by providing great transfer tools through her store, which is where I got my stylus and carbon paper.  The stylus has two different sized ends for you to choose from depending on the detailing of your pattern.  I used the finer end for these patterns.


Much better!  How awesome does carbon paper look after you've traced a pattern.  This could be set against a light background and framed as artwork itself!  Excuse the upside down Pennsylvania, which I traced for another recent project.  Once I get that project framed I'll be sure to share it with you!


I'm really hoping it doesn't take me another 4 months to get through this project!

Saturday, June 4, 2011

Ginger Skirt Muslin

It seems that I am destined to always be behind on sew along schedules.  The Ginger Party was Thursday and I'm just finishing up my muslin now!  Still, I think my muslin turned out great.


It will look even better when I'm not wearing my pajamas with it!  My hip measurement was 1/2" larger than the measurement for the size I cut, and I think the muslin is a wee bit tight around my hips.  When I cut out the muslin, I cut a 1" seam allowance, so I'm going to borrow from that in the hip area to give myself a little more room.  Other than that, I think it fits perfectly!  The skirt was pretty easy to whip up once I had everything cut out. 

I picked up a really nice navy blue chambray at Joann last week for the final skirt.  Hopefully tomorrow I'll be able to finish the real deal.  Stay tuned!