Wednesday, September 21, 2016

Crayon Challenge Mini Quilt

The upside to having pneumonia is the copious amount of couch time that accompanies the exhaustion. Before I got sick I was on track to finish the mini quilt that I made for my quilt guild's Crayon Challenge that started in June. We blindly chose three crayons and were tasked with making a quilt using only those colors and a neutral if we wanted. I'm glad I didn't push to finish before our September meeting since I was in the hospital instead of ogling my guild mates' beautiful quilts!

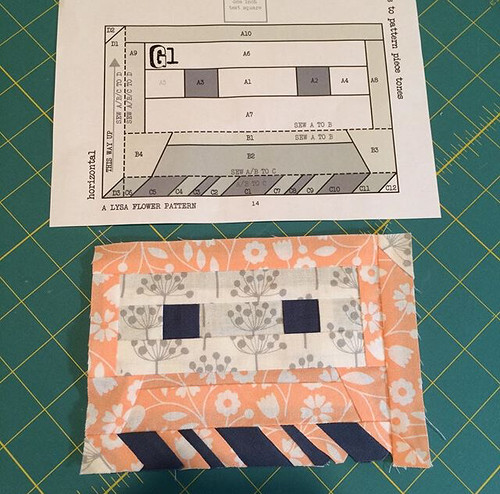
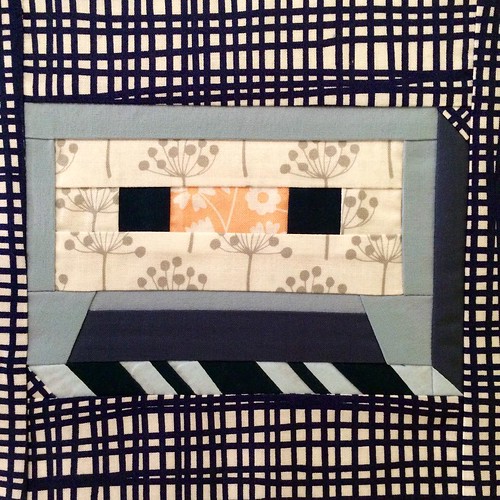
At first I was a little concerned with only using four colors but then I remembered the Summer Sampler blocks that I've been receiving every Monday for the past few months. Have I mentioned my love for classic quilt blocks? Perfect for only using four colors!

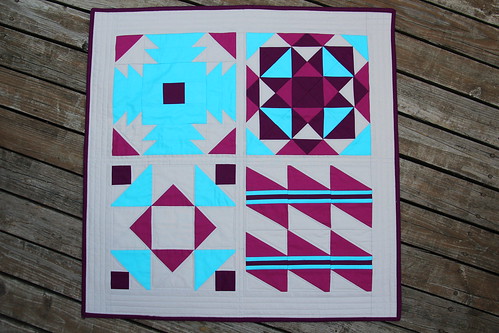
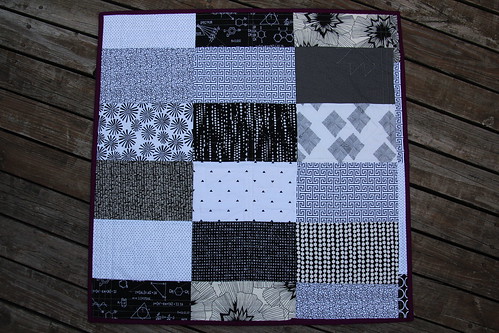
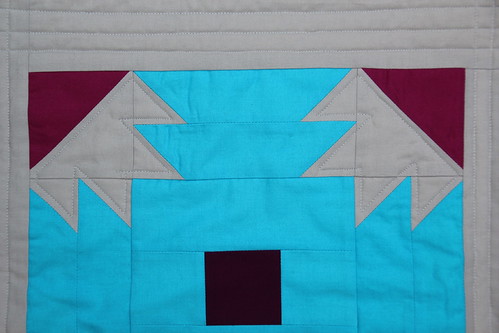
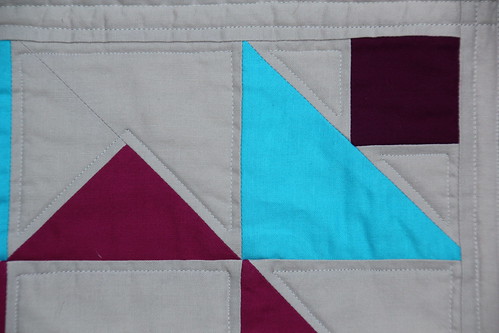
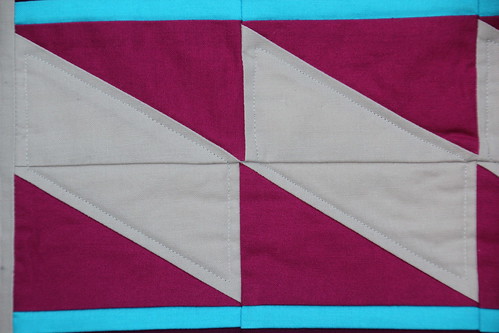
I admit that I totally lucked out with my colors. I probably wouldn't have put this quilt together on my own, but I love how it turned out and the colors are totally fun and go perfectly together. I used Kona solids Ash, Berry, Cerise, Peacock to make the Parallel, Deck of Cards, Summer Slice, Corner Canyon blocks.

IMG_1224

For the back I used some of the prints that I got in a black and white fabric swap at our last guild meeting. How much fun is this guild?! I'm so glad I found them last year.

IMG_1225

I've stuck to straight line quilting on all of the quilts I've made so far, either diagonal, stitch in the ditch, or a grid across the entire quilt. I really wanted to go outside of my comfort zone for the quilting on this one, especially since I finished piecing it in July and theoretically had plenty of time to figure out my quilting plan. But of course I procrastinated and chickened out and ended up sticking with more straight line quilting. HOWEVER, I got a little adventurous and instead of straight line quilting across the entire mini, I highlighted the gray sections of the quilt blocks. Even though I wimped out, I love the effect that the quilting added.

IMG_1243

And then I straight line quilted in the sashing and the borders. I couldn't resist! Plus I love the grids that the quilting created in the corners and in the middle of the quilt.

IMG_1231

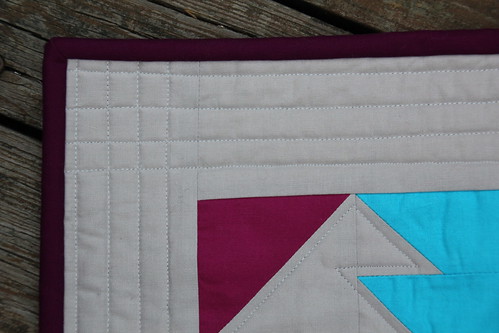
Here are some more detail shots because I couldn't resist.

IMG_1232

IMG_1237

And this is where my couch time came in handy. So many threads to bury!

IMG_1239

Check out the quilts that my guild mates made for the challenge. There is such a wide range of quilts, I wish I could have seen them in person!

Monday, September 12, 2016

Paper Pieced Cassette Tape Mug Rug

For our June meeting, my quilt guild hosted a paper pieced mug rug swap. I had done very little paper piecing up until that point so I took this as a challenge and dove right in. I found Lysa Flower's Cassette Tape pattern and it looked kinda hard, but I decided to go for it since a small mug rug wasn't a huge commitment. If it didn't work out, I could always make something less complicated.

My first attempt went pretty well, but I didn't cut the bottom pieces of the cassette large enough so there were a few gaps along the bottom edge. I learned very quickly that I need to test the seam before I sew it to make sure that the piece is going to flip the correct way after pressing. Unpicking those tiny stitches is really not fun. This post by Lee Heinrich on the Bernina We All Sew blog was extremely helpful.

Paper pieced cassette tape, take 1

The second time around I cut very generous pieces for the entire pattern and I think it turned out really well! The only thing I'd change next time is to not add this wonky crosshatch border around it, because even though my seams are pretty straight, the bottom edge gives the illusion that it's very wonky. I used Lotta Jansdotter and Elizabeth Olwen scraps for the finished mug rug, along with some blue solids.

Paper pieced cassette tape, take 2

Here are all of the awesome mug rugs from the swap. I came away with the adorable pink steaming tea cup second from the left in the top row, made by our president, Neva!

09
Photo credit: Maggie from CJMQG

Sunday, September 11, 2016

Pretty Sewing Supply Storage

This train case was an impulse project after I stabbed myself once too many times on pins while reaching into my sewing supplies zipper pouch. I've only made a handful of bags over the years, so initially the Sew Sweetness Crimson & Clover Train Case was a little intimidating. But, with my seam ripper handy, I decided to tackle it one step at a time and it wasn't so bad at all! And no, I can't even look at this thing without getting "A Praise Chorus" in my head.

Sew Sweetness Crimson & Clover Train Case

This train case was the most complicated "bag" that I've sewn so far, but, like all of Sara's patterns, it's broken up into short logical steps that are easy to follow. I even made my own piping for the first time, something I thought would be fiddly and hard but turned out to be super easy, especially with the use of my Bernina piping foot (I used foot #12, but you could also use foot #38).

Sew Sweetness Crimson & Clover Train Case

Construction got a little nerve wracking toward the end when there were many layers to sew through, but I took my time and sewed slowly and carefully and it all worked out. I dipped into my Lizzy House stash since the case would be sitting alongside my sewing machine for the foreseeable future and I wanted the fabric to be something beautiful that I loved. The finished case has a zipper pocket in the top flap and smaller pockets all along the edges of the lower half. It fits my everyday sewing tools perfectly with room to spare!

Sew Sweetness Crimson & Clover Train Case

Around this time I also made sheaths for my scissors using A Threaded Mess' 30-Minute Scissor Keeper pattern. My Gingher scissors came with a black plastic sheath, but my other scissors have been floating around in my zipper pouch just waiting to stab me or bust through the pouch fabric. Since I was getting my tools organized, I decided to make pretty sheaths for all of my scissors and avoid a scissor incident before it occurred.

I raided my scrap bins for these and easily found enough to cover two large and one medium size scissor keepers. Mine took a little longer than 30 minutes each, but mostly because I was piecing together small scraps and then I quilted them to get a little fancy. The pattern calls for a small piece of cardboard to be inserted at the tip of the sheath so the points of your scissors don't poke through. I used pieces of a cereal box: it's just sturdy enough for the added protection but not so stiff that it's hard to maneuver into place. I gladly threw that sad black plastic sheath in the recycling when I was finished!

Scissor Keepers

Hurray for pretty sewing storage! Why do I feel like this is going to be a slippery slope and lead to me finally replacing the standard red sewing machine cover that came with Pippi to something more pretty?

Saturday, September 10, 2016

Reusable Household Items

I don't know about your household, but our house goes through a ton of paper towels, especially now that we have a toddler. All of the cost and paper waste was killing me, so I finally decided that enough was enough and in May I made reusable paper towels. Life. Changing.

I picked up 1.5 yards of terry cloth and flannel, sliced them up, paired them together, and ran them through the serger. Quick, dirty, and simple. And thus was birthed my favorite make of 2016 (aside from the baby boy that I will be birthing in November). Yes, I'm already declaring it the winner! Everyone in the family loves them! We use them for everything: spills, wiping up the kiddo after meals, while cooking, wiping up counters, for drying fruit after its washed: you name the kitchen task, and we find a way to use the reusable paper towels.

What makes the reusable paper towel concept work so well is that I made so many of them. The 1.5 yards made 34 paper towels that are about the same size as a single sheet in a Bounty select-a-size roll. This is key. If I had made fewer, I think we would use them far less often, but since there are so many, we never run out and therefore use them all of the time. We keep them in a stack on the end of our kitchen island so they're easy to grab in a pinch.

Reusable paper towels and cotton rounds

When I was searching for ideas, I saw some sets on Etsy that have snaps and connect together to look like a roll of paper towels. This is a cute idea, but in reality I think having to deal with the snaps would just get annoying. Plus you can't fit nearly as many on a roll as we have in our stack. My daughter even likes to take one every so often to use in her play kitchen! At least once a week, either my husband or I will marvel at how great they are (maybe we are a little too easy to please). I can't praise these suckers enough. Do yourself, your wallet, the environment, the world a favor and make yourself some of these things. You won't regret it!

While I had my serger out I also made reusable cotton rounds out of cotton fleece. I went the super easy route again and just serged two layers of fleece together and again the result was awesome. We don't go through nearly as many cotton rounds as we do paper towels, but it seemed so wasteful to throw away the rounds after only using them to apply astringent. I still use disposable cotton rounds to remove nail polish, but the reusable rounds have reduced our consumption of disposable rounds. I throw these in a lingerie bag before I put them in the wash so they don't get lost among the other items in the laundry (similar to what I do for the kiddo's socks) and then air dry them on top of the dryer so they don't get all pill-y and rough.

I'm curious to see what other reusable items you guys have made, life changing or not. What am I missing that can lessen our impact on the environment?

Friday, September 9, 2016

Pillow Covers for Grandmom

Earlier this year, my grandmother moved from an apartment to assisted living. Her new room was pretty drab, so I whipped up these pillow covers to brighten up her space. They are both made from Canoe Ridge Creations Fresh Mini Quilt Club patterns (Acorn pattern is from September 2015 and Farm Fresh is from January 2016) and both are made entirely from scraps! I love scrap buster projects: not only are they economical, but they cut down on the piles of scraps that fall over every time I go digging through my stash. It's a win-win.

Pillow covers

In retrospect, I made the Farm Fresh cover a little too unbalanced colorwise, but I was determined to use scraps and get these out the door quickly to my grandmother. At the very least, it is bright and cheerful and it makes me smile even if it is a little nutty. They have a simple envelope style back so the covers can be washed. I also labeled the back just in case her fellow assisted living mates think of getting sticky fingers! Just kidding... mostly.

If you're not familiar with the Fresh Mini Quilt Club, it's a club where Megan sends you a new mini quilt pattern every month. They're quick and easy, all measuring between 16" and 24", so even if you aren't using scraps, they aren't a big investment to make. The last round just ended, but be on the lookout for the next round starting in the next couple of months! Megan's IG is wonderful and she's always posting beautiful pictures of rural Iowa where she lives with her husband. It makes me want to travel out west again really bad!

Wednesday, September 7, 2016

Quick and Easy Craft Fair Apron

Back in March, the day before my first craft fair selling rope bowls, I got the idea to whip up a simple half apron to hold cash and my phone. Considering I still had a very long list of things to do to prepare and a firm cut-off time so I could drop Pippi (my machine) off for a much needed cleaning, I was not surprised when I got the "you are nutty" look from my husband when he realized what I was doing.

I quickly dug through my scrap pile and decided that the leftover fabric from Hazel the Hedgehog would perfectly match the colors of the rope bowls that I would be selling. Because everyone needs their apron to match the merchandise.

After 5 minutes of perusing Google Images, I decided to use the measurements from Sugar Bee Crafts combined with the ties from More Like Home (except I added a little length because I wasn't using bias tape). I liked the design from Crafty Staci the best, but there was no time for zippers and snap pouches. I had less than 2 hours from cut to finish! And I also didn't have a zipper in my stash that matched the fabrics. I was determined to make this a cheap, if not free, project.

Instead of using interfacing, I lined each layer with leftover cotton duck from the Sewing Circle Tote. I liked how it added stability but didn't make the apron stiff.

I zoomed through making the apron part and then realized that I didn't have enough fabric for the ties. I considered using the little time I had left to dig through my stash to look for new fabric, but, knowing what's in there, I realized that nothing would be as perfect as the fabric I had chosen. So I decided to pack things away and pick up some more of the tie fabric when I dropped Pippi off. After all, I had my old sewing machine in the attic that I could use to quickly make the ties....

You see where this is going, right? There is a reason why I got a new sewing machine 6 years ago and why my old one was confined to the attic. She is pretty but she is the devil. She never stitched nicely, always jammed, and was a constant source of frustration. Plus, I don't even know if I still have bobbins to fit her. This led me to question why I even still keep this machine under our roof. And yet, I still asked my poor husband to pluck her from the attic. And then she sat on the floor by the dining table untouched for 4 days and was then returned to the attic after I got Pippi back.

Super easy craft fair apron

So my apron didn't get finished in time for the craft show. Not a huge loss since the show was kind of a bust and I wasn't constantly running to and from my cash box. The small crowd that was there wasn't buying anything from anyone and they weren't really our target audience anyway. We had a bunch of wonderful friends and family who came to support us though. Thank you to everyone who came out! One of my two non-family sales had me sign the bottom of the bowl!

A couple of months later was my second craft fair, Handmade Hopewell, and the apron worked out wonderfully. And it was a great crowd so not only did we sell a ton of bowls, but we got to chat with a bunch of really awesome people. Here I am, newly pregnant and dealing with crazy unseasonably cold May weather for PA/NJ. It was raw and chilly but we made the best of it. We'll see you there next year!

Handmade Hopewell Booth

Monday, September 5, 2016

Abby Glassenberg's Asleep Awake Doll

Oh, hi! Remember when I used to blog regularly? It seems that Instagram has become so much easier for posting my sewing progress that I've neglected this poor old blog. I'm still an avid keeper of my sewing spreadsheet, which has morphed so much over the years that I might do a new post about how I keep myself organized. But I was starting to miss being able to see a quick snapshot of the projects that I have completed over the course of a year, so I'm going to make every attempt to bring this blog back, if only to write a little more in-depth about my finished projects than IG allows. Get ready for some massive catch-up for this year (in no particular order)!

First up, Abby Glassenberg's Asleep Awake Doll! I loved these adorable dolls when I first saw the pattern but resisted purchasing it until I had an actual need, which happened to coincide with a sale. Bonus! I made one for my adorable niece's first birthday and, since I had originally wanted to make one for my daughter, I decided to make two at once. This pattern is so quick and easy! I could have made them both in one night had the Olympics not taken over my entire life before the birthday party. So this little dolly got gifted a little late. Thankfully the birthday girl nor my friend minded!

doll2

I made a couple of adjustments as I sewed these little cuties up. First, I cut out the fabric pieces for the awake side of the doll first, sewed them together except for the head, and then used the body of the awake side to cut out the asleep side (the awake side uses different fabric for the arms/legs/body/shoes while the awake side uses one fabric for the entire body/shoes). This was much quicker than taping together the pattern pieces to cut out the asleep body as the instructions state and now I can reuse the pattern pieces without having to cut/rip apart the taped pattern pieces. Plus I ended up with exact copies of the asleep and awake sides, which worked nicely when I was sewing the two sides together.

My second adjustment was to use embroidery floss to sew the hair pieces onto the head. The pattern calls for you to sew the hair pieces on with your machine, but honestly I forgot to pick up matching thread when I bought the felt and I didn't feel like going back out for such a tiny amount of thread. Since I have a crazy large embroidery floss stash, I easily found the perfect color and used that instead. I love the texture it adds! And aren't the pigtails adorable?

doll3

The best part about these dolls is that they're entirely made from scraps except for the felt and the flannel. I wanted these to be girly, and the only flannel I have in my stash are small pieces from my epic I Spy bag production or remnants from my nephew's explorer vest. Neither would work! I was able to cut both dolls from a fat quarter of flannel though, so the additional fabric wasn't a huge expense.

I will definitely be making a boy version for our little guy when arrives in November!