Showing posts with label Karma Police. Show all posts

Wednesday, February 15, 2012

Put a Bird On It

This was the second year that Nick and I made hearts for the Hearts and STARS fundraiser and our third year attending. Our pals Lauren and Keeva were running the show this year! Even though I had my idea for my heart well before the new year, I somehow managed to wait a mere week before the hearts were due to start it. Thankfully we both finished our hearts on time.

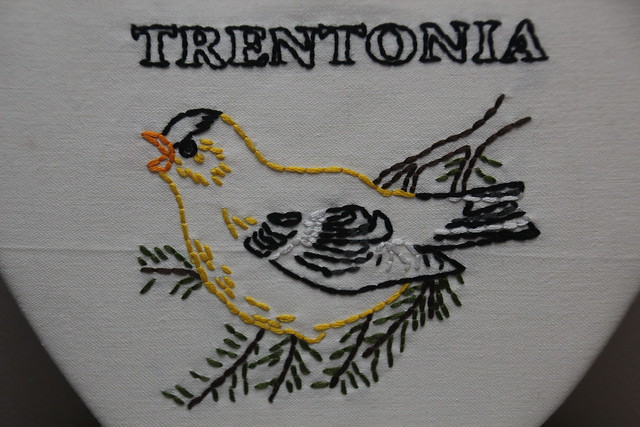
The fundraiser takes place in a really cool space in Trenton called Art Works. It's so much fun seeing something that you made being displayed on a gallery wall! I took inspiration from the hilarious Portlandia and made mine pretty by putting a bird on it. It's the Eastern Goldfinch, the state bird of New Jersey.

005

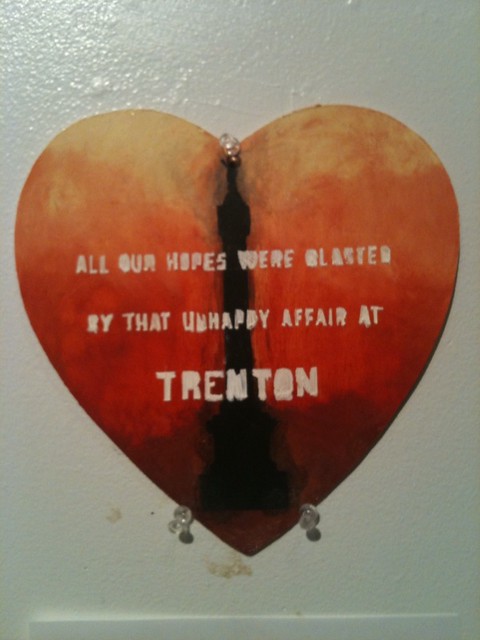
Nick took inspiration from the Trenton Battle Monument. His included a silhouette of the monument and an excerpt from the quote that is displayed at its base. The colonial secretary of state for King George III, Lord Germain, told Parliament three years after the battle: "All our hopes were blasted by that unhappy affair at Trenton." Sorry, Brits!

nicksheart

We each raised $30 for our hearts, making our grand total the same as last year. I was really hoping to beat Nick this year since he beat me last year, but at least I increased the amount that someone bid on mine.

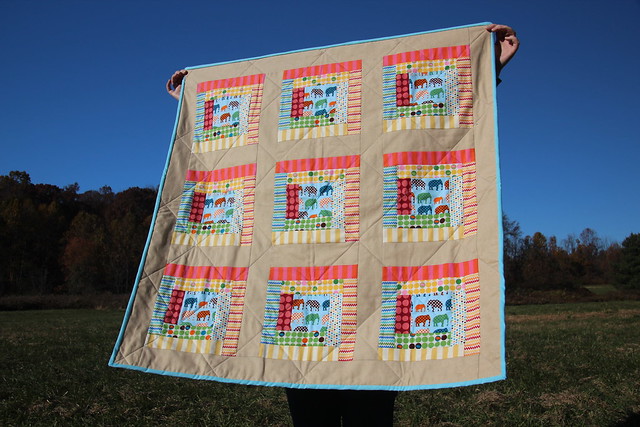
We didn't get to stick around too long for the after party this year because I had to rush home and finish MaMotts' quilt. Hearts and STARS is always a good time, so if you're in the area, consider checking it out next year. It's always in the beginning of February and supports a really great cause!

  008

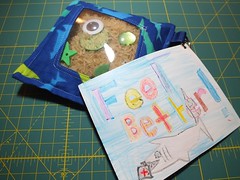
And look what Nick made me for Valentine's Day!

My Valentine's Day Card from Nick!

For those of you who don't know (which is probably most of you), Nick and I met as teenagers working in the gift shops at Sesame Place, the Sesame Street themed amusement park in Langhorne, our hometown. Outside of the shop that we originally both worked at, there used to be a staircase with a giant Big Bird Head on top (it was once the start of an awesome bridge that used to wind through the park). It's hard to believe that was 12 years ago! Isn't he the best? Happy belated Valentine's Day!

Saturday, December 31, 2011

My Year in Review

I probably say this every year, but I can't believe another year has gone by already.  At the beginning of this year, I started this blog and set a few goals that I wanted to accomplish over the past 12 months.  I did really well!

1) Make 14 items for charity.  
Konbit Sante Delivery KitJust One Star ChallengeI Spy Bag

You've heard of Craft Hope, right?  Back in the beginning of the year, they collected birthing kits for the organization Konbit Sante to send to Haiti so women would have access to a sanitary and safe delivery.  I was more than happy to put together a couple of receiving blankets and toys for the new moms and babies.  Craft Hope was able to collect 2,510 birthing kits for the women in Haiti!  I am so happy to be part of such a great movement.  The best news is that Craft Hope recently heard from the organization and they shared that the birthing kits have made the women excited to seek out prenatal care.

In March I made a quilt block as part of a challenge hosted by Moda to send a quilt to an injured soldier.  It was my first time making a star quilt block and I was surprised at how easy it was.

And in April I undertook a sewing marathon to pre-make 100 I Spy games to give to patients at St. Christopher's Hospital for Children.  We helped the kids that participated in Take Your Kids to Work Day at my workplace fill the bags with rice and charms and then we sewed them up.  The kids loved the activity and so did the kids at St. Chris!  Technically I only fully made 36 of the bags from start to finish, so I'm only counting those bags toward this goal.

End result: I made 39 items for charity this year, which was a tad over my goal.

2) Sew one wearable dress, skirt, and blouse.
I went conservative on this goal because up until January, I had struggled with garment making.  Thankfully I overcame my issues and was able to fulfill this goal.

Lisette Passport DressChambray Colette GingerYellow Gingham Pendrell

From left to right are my Passport dress, Ginger skirt, and Pendrell blouse.  Although it wasn't included in my goal, I think my very favorite garment that I made this year is my Amy Butler Runabout Jacket.  The terrible thing is that I finished it in the early summer and I haven't been able to wear it yet!  I'm very excited to wear it this coming spring.

Amy Butler Runabout Jacket

Thankfully I've made a few other garments, including another Ginger, another Pendrell (which doesn't fit me but fits my sister!), and another dress (New Look 6557).  I hope to increase the number of garments I'm able to make next year.  Some of these projects took me way too long!  I am glad that I'm slowly adding staples to my wardrobe, which was the point of learning how to sew my own clothes.

3) Make one quilt.
Although I started out thinking I would make a quilt for our house, I ended up making another adorable baby quilt!

Henry's Quilt

This was my first attempt at log cabins.  They turned out to be so easy!

4) Knit 10 panels for an afghan.
I'm going to be honest: about a month ago, I didn't think this goal was going to happen.  But I've gone into knitting overdrive and am happy to report that I finished 10 panels this year!  I somehow managed to finish 4 panels in the past month or so.

Panels for AfghanPanel #2 for AfghanPanel #4Panel #3Fifth Panel for BlanketPanels 7 & 8

So what am I planning to do with all of these panels?  Piece them together of course!  I have no idea how that works, but I'll worry about that once all of the panels are knitted.  Here are all of the panels I have finished so far, including the last two that I didn't get to photograph individually.

Knit Panels for Afghan
This isn't the order that they are going to be in when the whole thing is pieced.  I just lined them up randomly to see how  long and wide the panels are so far.

After I laid them out on the floor I realized that I am really close to being finished!  I'm going to knit two more panels so I have two of each of the colors and then figure out the whole piecing thing.  I hope to be finished before March!

5) Run the Broad Street Run in under 2 hours.
Mr. Pinds and I were able to finish the race in 1 hour and 55 minutes, a whopping 5 minutes under our goal! I was a little delirious at the end, but I'm so proud of our progress.  And we were able to raise $640 for Back on My Feet, which really makes all of the pain of training and running worth it.

For a full list of everything that I made this year, check out my 2011 Completed Projects page!

Come back tomorrow to see my goals for 2012!

Tuesday, August 9, 2011

2nd Annual Action Kivu Fundraiser

For the second year, Alissa over at Handmade by Alissa is organizing a fundraiser for Action Kivu, an organization that teaches women who are affected by the conflicts in Eastern Congo how to sew.  Here's a little bit more about Action Kivu from Alissa's blog:

"The conflict in Congo has taken the lives of over 5.4 million people since 1998. Rape is used as a weapon of war, with estimates putting the number of rapes in the hundreds of thousands.  This is truly difficult stuff to think about but together we can really make a difference for some specific women who need our help.
By learning to be seamstresses these women can then support themselves and their families. Action Kivu also pays to send Congolese children to school.  You can read a lot about them on their web site."

Image Source

Donating to this cause was a no-brainer for me since it empowers women in the present and gives them the tools to support their families now and in the future.  Check out the Action Kivu blog for some amazing stories about how the program has helped the women in the program.  And look at the beautiful fabrics they get to work with!

Stop on over at Handmade by Alissa to donate and enter to win one of many amazing giveaways.  As with every fundraiser, every little bit helps!

Tuesday, May 31, 2011

I Spy Bags for St. Chris Patients

Aren't days off great for getting to all of the things that you put off?  Back in April, I ran an activity during Take Your Child to Work Day at my workplace where the kids made I Spy bags. (Learn how to make your I Spy bags—it's really easy!)  The kids were able to make one for themselves and make one for a patient at St. Christopher's Hospital for Children.  During the activity, the sewing machine that I was using to sew up the bags broke, and we were left to hand sew the opening in the bags.  Since this took way longer than it would have using a sewing machine, we were only able to hand sew the bags that the kids were making for themselves.  That left me with the task of stuffing and sewing up the rest of the bags.

The kids who attended Take Your Child to Work Day were also encouraged to bring a book for a patient at St. Chris.  Since the date hadn't been set to deliver the books and the I Spy bags, I of course put off finishing the rest of the bags so I could work on other more timely projects.  Before I left work this past Friday I received news that the delivery date would be June 7th, so I moved the I Spy bags up to the top of my "Memorial Day Weekend To Do List."

I am glad to say that they are all now finished and packaged up for the kids at St. Chris.  During the activity, the kids were able to make 14, and this weekend I made 36, making a grand total of 50 I Spy bags for St. Chris patients.  I'm beyond excited that we are able to donate so many!


This project allowed me to officially cross off my resolution to complete 14 items for charity.  Not that I'm going to just take it easy for the rest of the year though.  We're not even halfway through yet!

Wednesday, March 23, 2011

Just One Star Challenge

A couple of the blogs I follow recently posted about participating in the Just One Star challenge.  The challenge, hosted by Moda in conjunction with the Semper Fi Fund, asks each person to piece together a star, which will then be combined to create a quilt for an injured soldier.

Although I've never pieced together a star before, this came together pretty easily and quickly.  Moda provides the instructions for you and they include diagrams, which I find immensely helpful.  You don't need much fabric for this star—I was able to use scraps from previous sewing projects.  Here is my finished product.


Getting there doesn't take much time at all.  First, cut out all of the pieces as specified on page 2 of the instructions. 


Draw a diagonal line on the back of the 2" x 2" patterned pieces.


Then place the patterned piece and one of the 2" x 3.5" background pieces right sides together with the patterned piece flush left and the diagonal line pointing toward the top center.


Stitch along the diagonal line.

Trim the patterned piece 1/4" from the stitched line.

And press the patterned piece to the corner of the background piece.

Now, pin another 2" x 2" patterned piece piece to the other side of the background piece and repeat the same process.

You end up with a piece that looks like this.  Repeat these steps with the three other 2" x 3.5" background pieces and the rest of the 2" x 2" patterned pieces.

Once you are finished making the piece shown above, take one of them and sew two of the 2" x 2" background pieces to the sides, as shown below. 


Press the back away from the center.  Repeat these steps so you have 2 side pieces as shown below.

Take the pieces shown above and place them on the 3.5" x 3.5" patterned piece (the star center) with right sides together.  Stitch 1/4" seam to attach sides.

Take the other two side pieces and place them on the star center with right sides together.  Stitch 1/4" seam to attach.

Press all back seams away from the center.  Look, it's a star!

Finger press the large triangle background pieces in half to find the center.

Align the center of the background piece with the center of the star piece and stitch 1/4" seam.  Repeat on the opposite side.

Align the center of the other two background pieces to the center of the star piece and stitch 1/4" seams.

Press all back seams away from the center.  And you're done!

I always love when the back of the quilting looks as good as the front, and this star doesn't disappoint. 

I would have liked to match up the circles in the pattern so it doesn't look so crazy, but that's way beyond my skill level at this point.  I just have to find a brown pigma pen to sign my name and home state to the star and then it'll be on its way! 

Hopefully Moda will post photos of some of the finished projects.  I love when people get together for the common good, and I especially love projects like this that display the differing taste of its participants.  This is a great cause and won't take up too much of your time or money, so get stitching!

Monday, February 21, 2011

Konbit Sante Delivery Kits

The current Craft Hope project is to make delivery kits for Konbit Sante, an organization that is assisting to create a sustainable health care system in Haiti. Along with some supplies to ensure a sanitary delivery, Craft Hope asked us to include a receiving blanket and, optionally, a stuffed animal of sorts.  Here are mine (almost) all ready to go!

The totes are made out of a cotton print that I had in my stashed.  I picked up this super cute and soft flannel from Joann for the receiving blankets. 


I am in love with the bees and I was disappointed that I couldn’t find something as equally adorable for the boy blanket.


I had intended to make mitered corner receiving blankets, but I somehow managed to cut the backing fabric wrong, so I went with a very simple blanket.  They came together really quickly and easily.  I placed the fabric right sides together and stitched around the edges with a ½ inch seam allowance.  Then I turned them right-side out and top stitched around the edges with a ¼ inch seam allowance.
I had a 50% off coupon for Joann that I couldn’t use on the flannel because they were already on sale, so I picked up Lotta Jansdotter’s Simple Sewing for Baby.  There are a bunch of super cute things that I hope to make for future baby gifts.  I decided to use the soft rattle pattern to include in the delivery kits, but to keep the rattle out of it.  I don’t want to drive the new mothers crazy!
These giraffe rattles came together super quickly as well.  The ribbons on top were supposed to look like ears, but I somehow positioned them so they look like bows.  I thought they were cute like that, so I kept them.  They are the perfect size for a new baby to snuggle with!  Actually, do new babies snuggle with stuffties?  I’m new to this baby stuff!  I made one side of the giraffe the front fabric of the receiving blanket and the other side the back fabric.


I just need to pick up some string and plastic sheeting tomorrow, and then these kits will be packaged up and on their way to Konbit Sante!

Monday, February 7, 2011

Fleisher Art Memorial Print Love-In

Yesterday my pal Mo, one of her pals, and I checked out Fleisher Art Memorial's Print Love-In.  They set up a bunch of printmaking stations and you make Valentine's Day cards with designs created by Philadelphia artists.  It was so fun!  I had never done silkscreening and lithograph printing before, but it was actually pretty easy once you got the hang of it.  Using the wooden and linoleum blocks took me back to 7th grade art class.  We were given homework to bring in a picture of a celebrity, which I apparently completely forgot to do until we got to art class.  I frantically paged through the piles of magazines that our teacher had out, knowing that we would forget to bring in a picture.  Not knowing that we would be doing anything with this picture besides drawing, I, of course, chose Tanya Harding's sad face People magazine cover. I can't believe I found the exact picture!  We transferred the images onto a linoleum tile and I created a print of her and then stamped her face into clay to make a bowl, which is now referred to as the Tanya bowl.  That bowl is still displayed in our house.  My pal and tablemate carved Nancy Kerrigan and made a matching bowl.  True story.

Once I got home from our "big game" party last night, I spread out all of the prints and wondered what I was going to do with all of them.  I could write out cards for all of my friends and family, but then I remembered reading about Etsy's Special Delivery: Share Your Love 2011, where you send homemade Valentine's Day cards to Etsy, who distributes them to NYC elderly through Citymeals-on-Wheels.  After setting a few of my favorites aside, I wrote a V-Day note on the prints to be sent off to Brooklyn.

Here are the prints that I'm sending to Citymeals-on-Wheels.


And here are the prints that I'm keeping for myself to make cards out of. 


I saved the little girl in purple because it looks exactly like me as a kid.  Kinda scary. 

Saturday, February 5, 2011

Loot from Hearts and STARS

This year, Nick and I got our V-Day hearts in a little early.  Our pals Keeva and Lauren volunteer for STARS, the South Trenton Area Residents' Society, and last night was their second annual Hearts and STARS fundraiser.  They have a pretty awesome thing going with this fundraiser.  The locals pick up wooden hearts from various places around town, decorate them however they want, and then STARS hosts an auction to raise money.  It's exciting, gets the residents involved by decorating and then buying each others' art, all while coercing them to the auction at the very awesome ArtWorks, a studio in downtown Trenton that offers art classes and exhibitions.  We had a lot of fun perfecting our auction strategy last year and were super excited for this year's event.  To make it even more fun, we decided to decorate hearts as well.

Having lived in this area all of my life, I have developed a deep love for the Trenton Makes Bridge that connects Pennsylvania and New Jersey. 

Photo courtesy of Point Shoot Edit
 Look how awesome it gets at night.

Photo courtesy of jag9889

So it was obvious to me that my heart needed to be Trenton Makes themed.  The bridge was too small going straight across the heart, so I angled it up a bit.  It was actually pretty simple to make.  I drew the bridge in Illustrator, flipped it horizontally, printed it, traced it with a transfer pen, and then ironed the design onto the fabric below.  The embroidery was done in a night!


Nick went all fancy with his heart.  After picking up some balsa wood, he stained the heart and the wood, and made a special card catalog.


I think they turned out great, even if mine is slightly off-center.  Here they are in the gallery!


We also took away some masterpieces.  Here are last night's (bottom row) and last year's loot (top row).


This year's grand prize for us is this amazing piece of art that we got for an absolute steal.  Only $25!


There was something about this one that I love.  I think it's that the people are approaching the city on a raft of sorts.  It gives me the impression that they're about to embark on a great adventure.  He's going straight to my desk at work on Monday morning.
 

Peacock is also going to be living on my desk at work.  She's so colorful, plus it's made with puffy paint, which deserves an A in my book any day.


We picked up this guy at last year's Hearts and STARS.  He's made with onion skins.


We snagged this guy last year too.  It's a blueprint of the heart using chalk.  I love it.


Elephant continues to be my absolutely favorite.  Such detail and so calming.  It's brilliant.


The hearts are all displayed around the gallery with a sheet where you place your bids.  After a few hours, bidding closes, you pay what you bid, and take your heart home.  Nick and I have developed a sure-to-win strategy of standing in the general area of the hearts that we really need to leave with, but not too close to alert the others that you are the person who keeps bidding up.  You have to casually approach the heart like you're just taking it in, and when no one is looking, quickly and without causing a scene, up the bid.  It worked like gangbusters last night when I had to keep outbidding one guy for Peacock.  I think he left a little disappointed, but that's how the game goes! 

At the end of the night, Nick's sold for $35 and mine sold for $20.  Pretty good, I'd say!